
Every network starts with a physical foundation, structured cabling, switches, access points, but the moment your traffic hits the cloud, you need a different kind of protection. That’s where AWS Network Firewall documentation becomes essential reading for any IT director or business owner running workloads on Amazon Web Services. AWS Network Firewall gives you stateful and stateless traffic inspection directly inside your VPC, but configuring it correctly requires more than just clicking through the console.
At CommX Networks, we build the physical network infrastructure that commercial facilities across Southwest Florida depend on. We see firsthand how on-premise environments connect to cloud platforms like AWS, and we know that a secure network isn’t just about what’s in the server room. Protecting traffic at the cloud perimeter matters just as much as the Cat6 runs and firewall appliances we install on-site. That’s why we put this guide together, to help our clients and their IT teams close the gap between physical and cloud network security.
This guide walks you through the core components of AWS Network Firewall, from creating firewall policies and rule groups to configuring logging and routing. You’ll find step-by-step setup instructions, policy configuration details, and practical recommendations based on real deployment patterns. Whether you’re standing up a new VPC or tightening security on an existing one, this article gives you a clear path from documentation to deployment.
How AWS Network Firewall fits in AWS networking
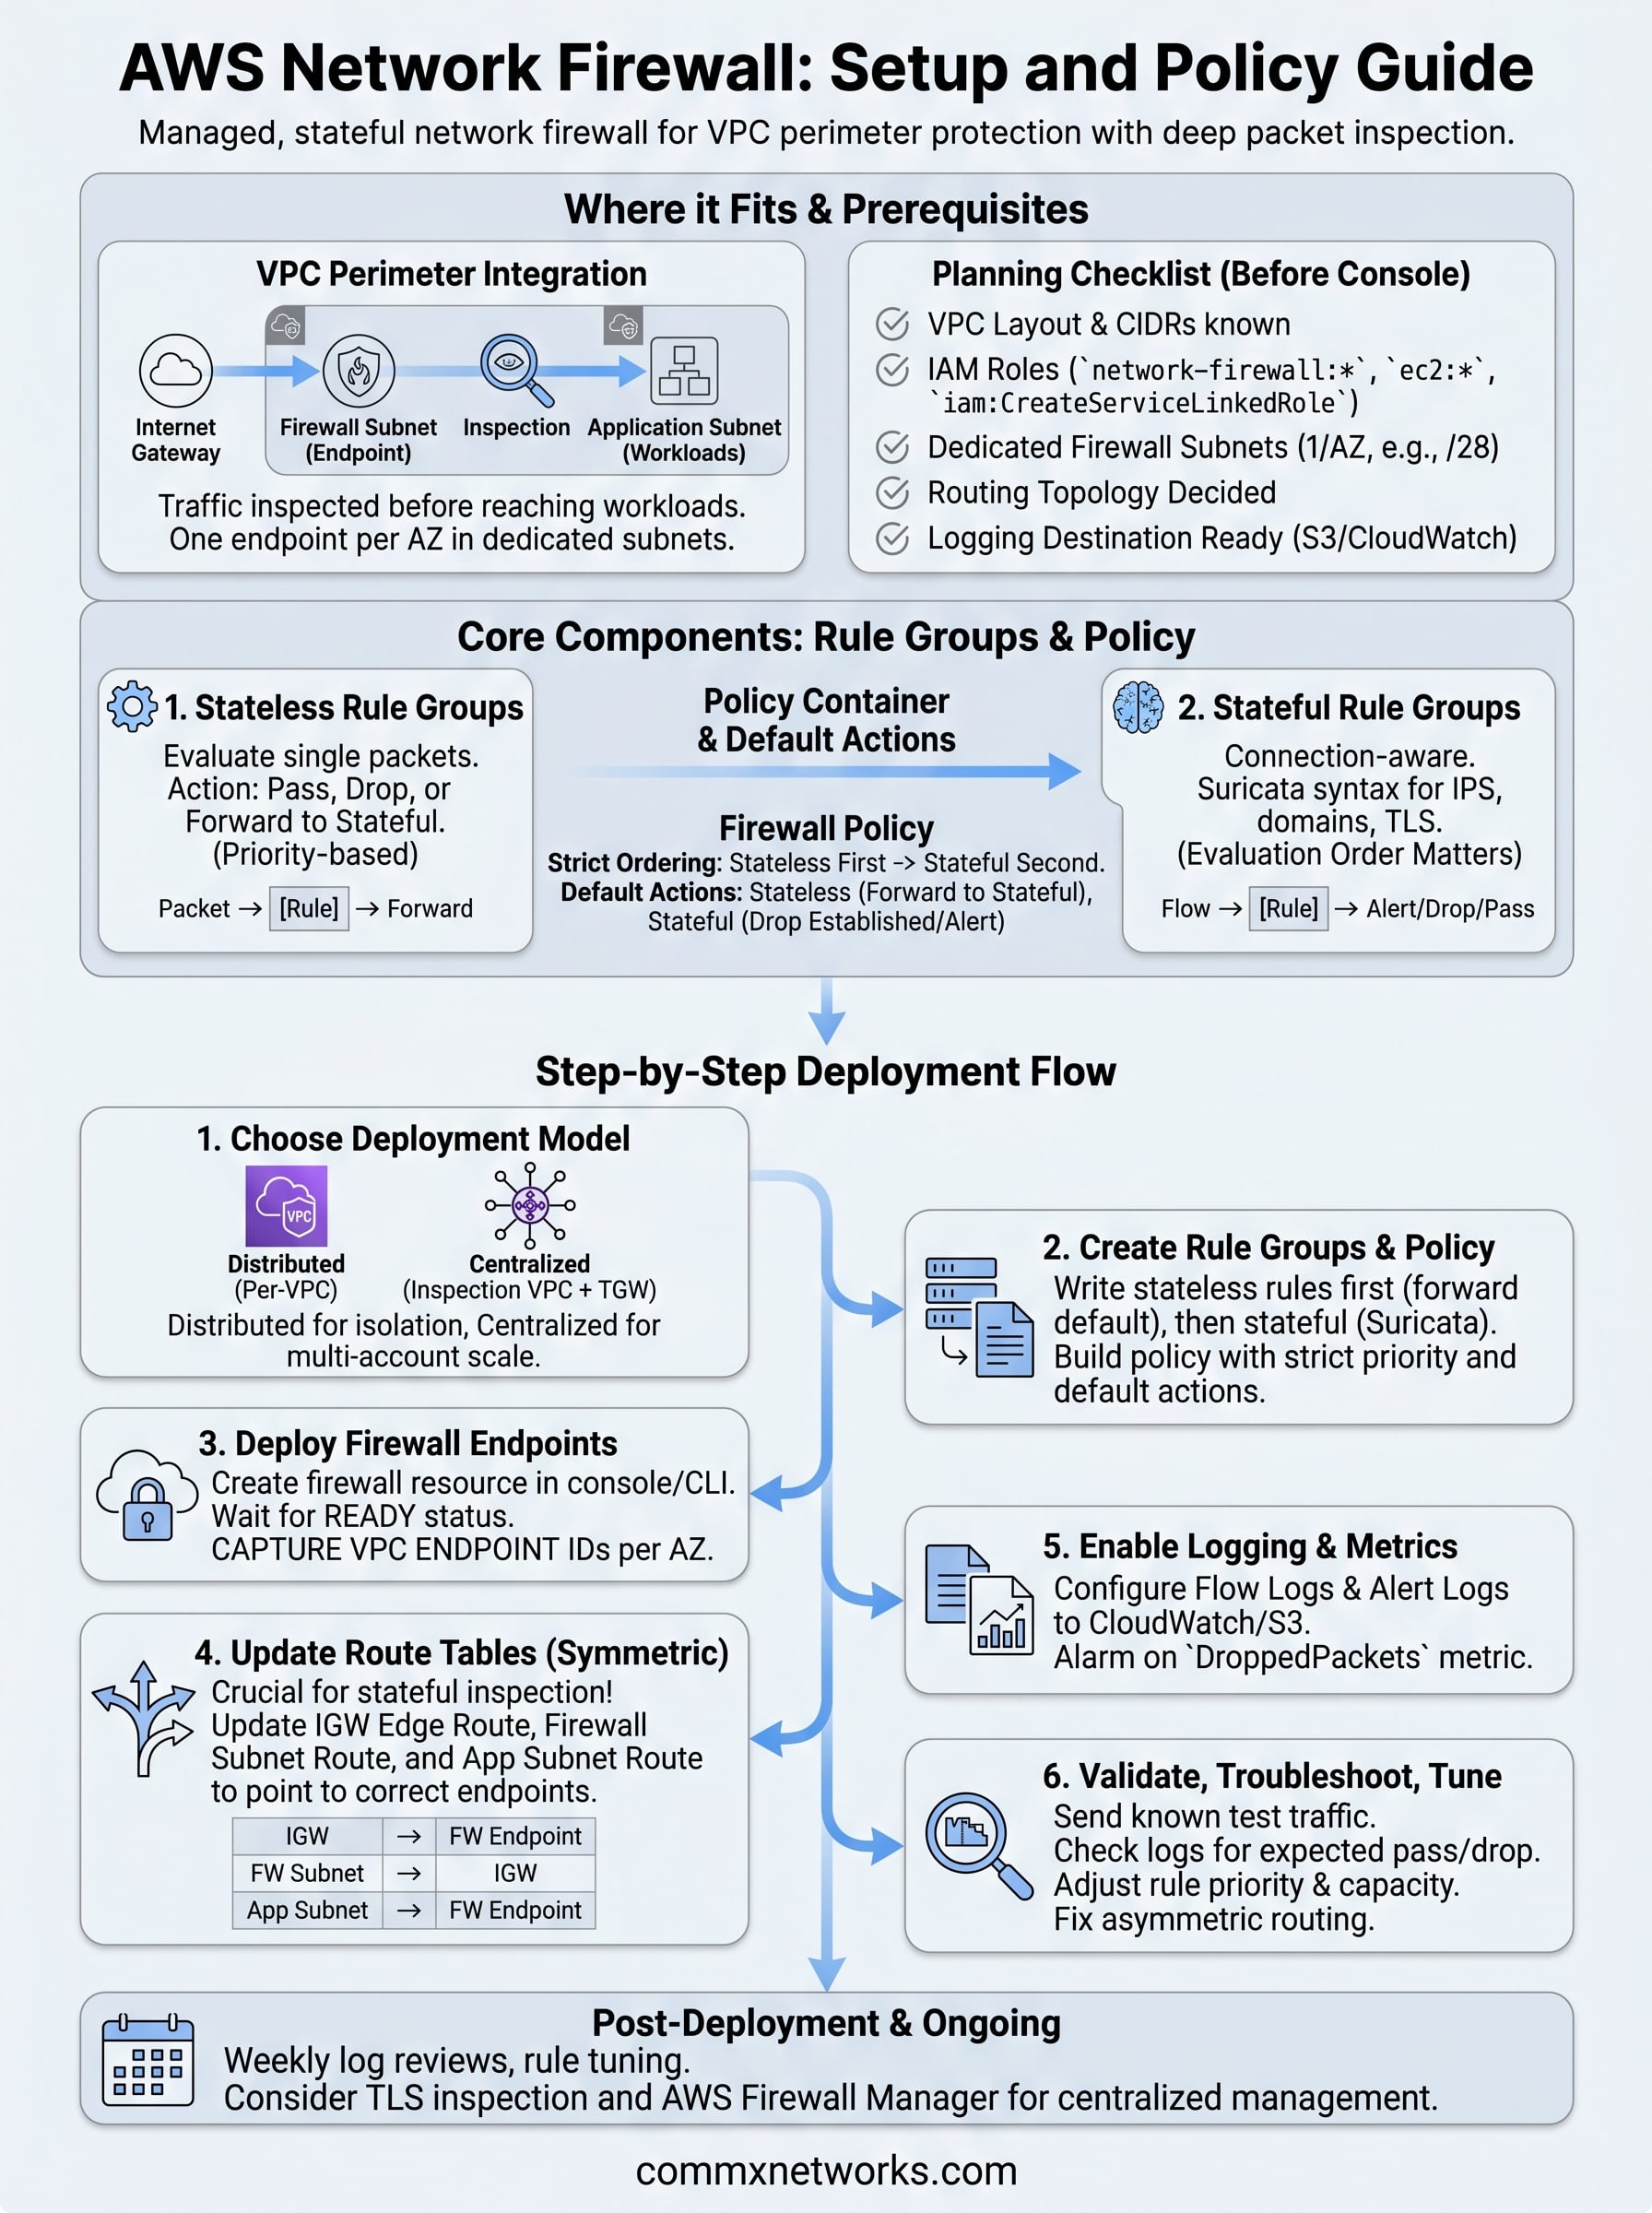
AWS Network Firewall is a managed, stateful network firewall service that Amazon runs at the VPC level. Unlike a traditional appliance you rack in a data center, this service deploys firewall endpoints directly inside your VPC, in dedicated subnets you designate. Traffic flows through those endpoints before it reaches your application workloads, giving you deep packet inspection, protocol filtering, and domain-based rules without managing any underlying hardware. Understanding where this service sits in the broader AWS networking stack is the first step toward a deployment that actually protects your environment.
Where the firewall endpoint lives in your VPC
AWS Network Firewall creates an endpoint in each Availability Zone you specify. Each endpoint gets placed in its own dedicated subnet, separate from your application, public, and private subnets. Your route tables then direct traffic through those endpoints so that every packet entering or leaving a protected subnet passes through inspection first. The official AWS Network Firewall documentation describes this as a distributed model, meaning you need one endpoint per AZ to avoid routing asymmetry, which breaks stateful inspection.
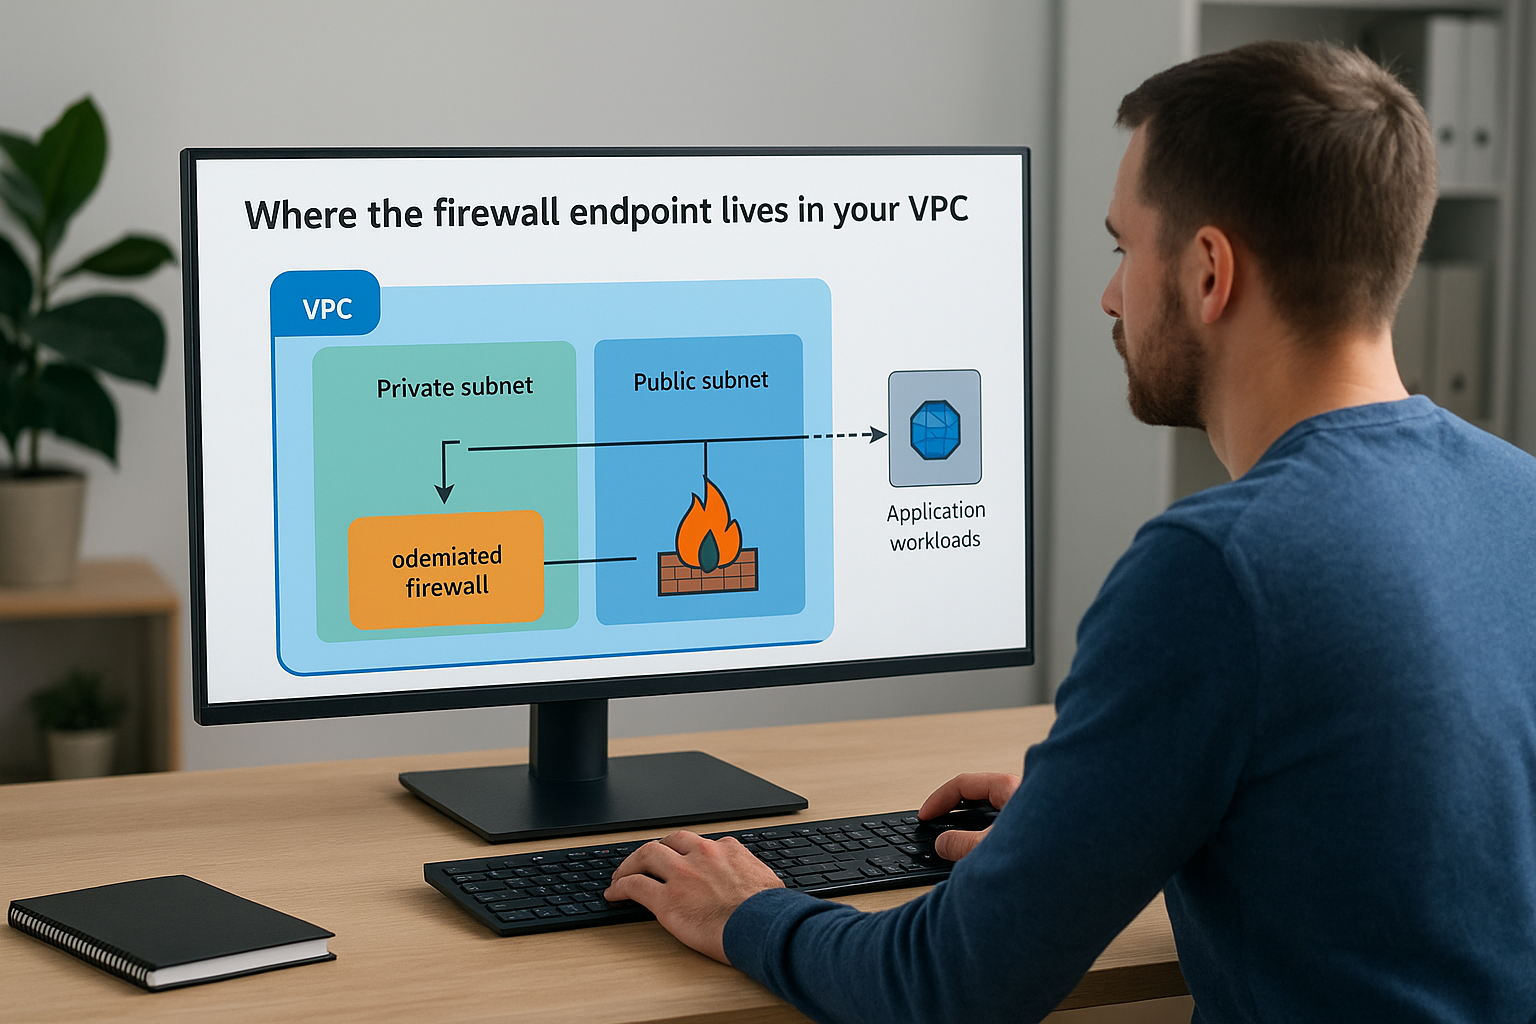
If you skip the dedicated firewall subnet and try to share it with other resources, your routing will break and stateful rules will drop legitimate traffic.
Those endpoints integrate directly with your VPC routing layer rather than sitting inline as a bump-in-the-wire appliance. That distinction matters because it means you control exactly which traffic paths hit the firewall by editing route tables, giving you precise segmentation without reconfiguring application servers.
How it compares to security groups and NACLs
Many teams already use security groups and network ACLs to control traffic in AWS, so it is worth being clear about what AWS Network Firewall adds on top of those tools. Security groups operate at the resource level and track connection state per instance. Network ACLs apply at the subnet level but are stateless, meaning you must write rules for both inbound and outbound directions independently.
AWS Network Firewall operates above both of those controls, at the VPC perimeter. It adds capabilities neither security groups nor NACLs can match: deep packet inspection, Suricata-compatible intrusion prevention rules, TLS inspection, and domain name filtering. You do not replace your existing security groups when you deploy this service. Instead, you get a layered model where perimeter traffic gets inspected first, and then security groups enforce host-level access.
Integration with the rest of your AWS environment
AWS Network Firewall does not operate in isolation. It connects to AWS Firewall Manager, which lets you apply consistent firewall policies across multiple accounts and VPCs from a single management point. For organizations running AWS Organizations, this is how you enforce a baseline policy across every account without logging into each one separately.
On the logging and visibility side, the service sends flow logs and alert logs to Amazon S3, CloudWatch Logs, or Amazon Kinesis Data Firehose. You configure that output at the firewall resource level, and alert logs follow the Suricata format, making them compatible with most SIEM platforms your team already runs. Connecting those logs to CloudWatch also lets you build metric alarms that fire when specific rule groups start blocking at unusual rates, which gives you a practical early warning signal for active threats or misconfigured rules.
Prerequisites and planning checklist
Before you touch the AWS console, you need a clear picture of your current VPC layout and the IAM permissions your team holds. Skipping this step leads to half-built deployments where route tables conflict or rule groups fail to attach because a role lacks the right policy. The AWS Network Firewall documentation lists the minimum IAM actions required, but in practice most teams need a combination of network-firewall:* and ec2:* permissions scoped to the specific resources involved in the deployment.
IAM roles and service-linked permissions
AWS Network Firewall requires a service-linked role called AWSServiceRoleForNetworkFirewall to interact with other AWS services on your behalf. AWS creates this role automatically the first time you create a firewall, but your IAM principal must hold the iam:CreateServiceLinkedRole permission for that to work. Without it, the firewall creation call fails, and the console error message is not always clear about the root cause.
Confirm that the IAM role you use for deployment has both
network-firewall:CreateFirewallandiam:CreateServiceLinkedRoleattached before you write a single rule group.
Run through this checklist to confirm your account is ready before you proceed:
- IAM permissions verified:
network-firewall:*,ec2:DescribeVpcs,ec2:DescribeSubnets,ec2:DescribeRouteTables,logs:CreateLogGroup,iam:CreateServiceLinkedRole - Target VPC identified: note your VPC ID, full CIDR block, and the Availability Zones where you run active workloads
- Dedicated firewall subnets planned: one per AZ, each with at minimum a
/28CIDR, containing no other resources - Routing topology decided: centralized inspection VPC versus distributed per-VPC deployment
- Logging destination confirmed: S3 bucket ARN, CloudWatch log group name, or Kinesis Data Firehose ARN ready to paste in
Network details you need before day one
Your VPC CIDR block and existing route table IDs are the two pieces of information you will reference constantly throughout this process. Pull both from the VPC console before you start so you are not switching between browser tabs mid-configuration. You also need to know whether your traffic currently flows through a Transit Gateway, an Internet Gateway, or both, because each path requires different route table entries on the firewall subnet and the protected application subnets.
Write down the exact subnet IDs you plan to designate as firewall subnets. Each one must sit in a single Availability Zone, must not host any other resources, and must have a valid route to the internet if you intend to inspect egress traffic. Locking down these details now prevents you from rebuilding subnets later when live traffic is already flowing through the environment.
Step 1. Choose a deployment model and routing path
AWS Network Firewall supports two primary deployment models, and the one you pick determines every routing decision that follows. Your VPC architecture and traffic volume drive this choice more than anything else. Getting it wrong means reworking route tables and firewall subnets after go-live, which is a disruptive process when production workloads are already running through the endpoints.
Distributed deployment (one firewall per VPC)
In a distributed deployment, you place a firewall endpoint directly inside each VPC that needs protection. This model is straightforward to configure and fits organizations that run a small number of VPCs or that have strict isolation requirements between business units. Each VPC manages its own firewall policy, so teams can write rules tailored to specific workloads without affecting other environments.
This model works well when your VPCs are largely independent. The tradeoff is policy management overhead: as your VPC count grows, keeping rules consistent across individual firewalls becomes harder without AWS Firewall Manager in place.
Centralized inspection VPC model
A centralized deployment routes all traffic through a dedicated inspection VPC connected to your other VPCs via AWS Transit Gateway. This is the model the aws network firewall documentation recommends for organizations managing multiple accounts or VPCs at scale. All east-west traffic between VPCs and all egress traffic to the internet pass through the central firewall before reaching their destination.
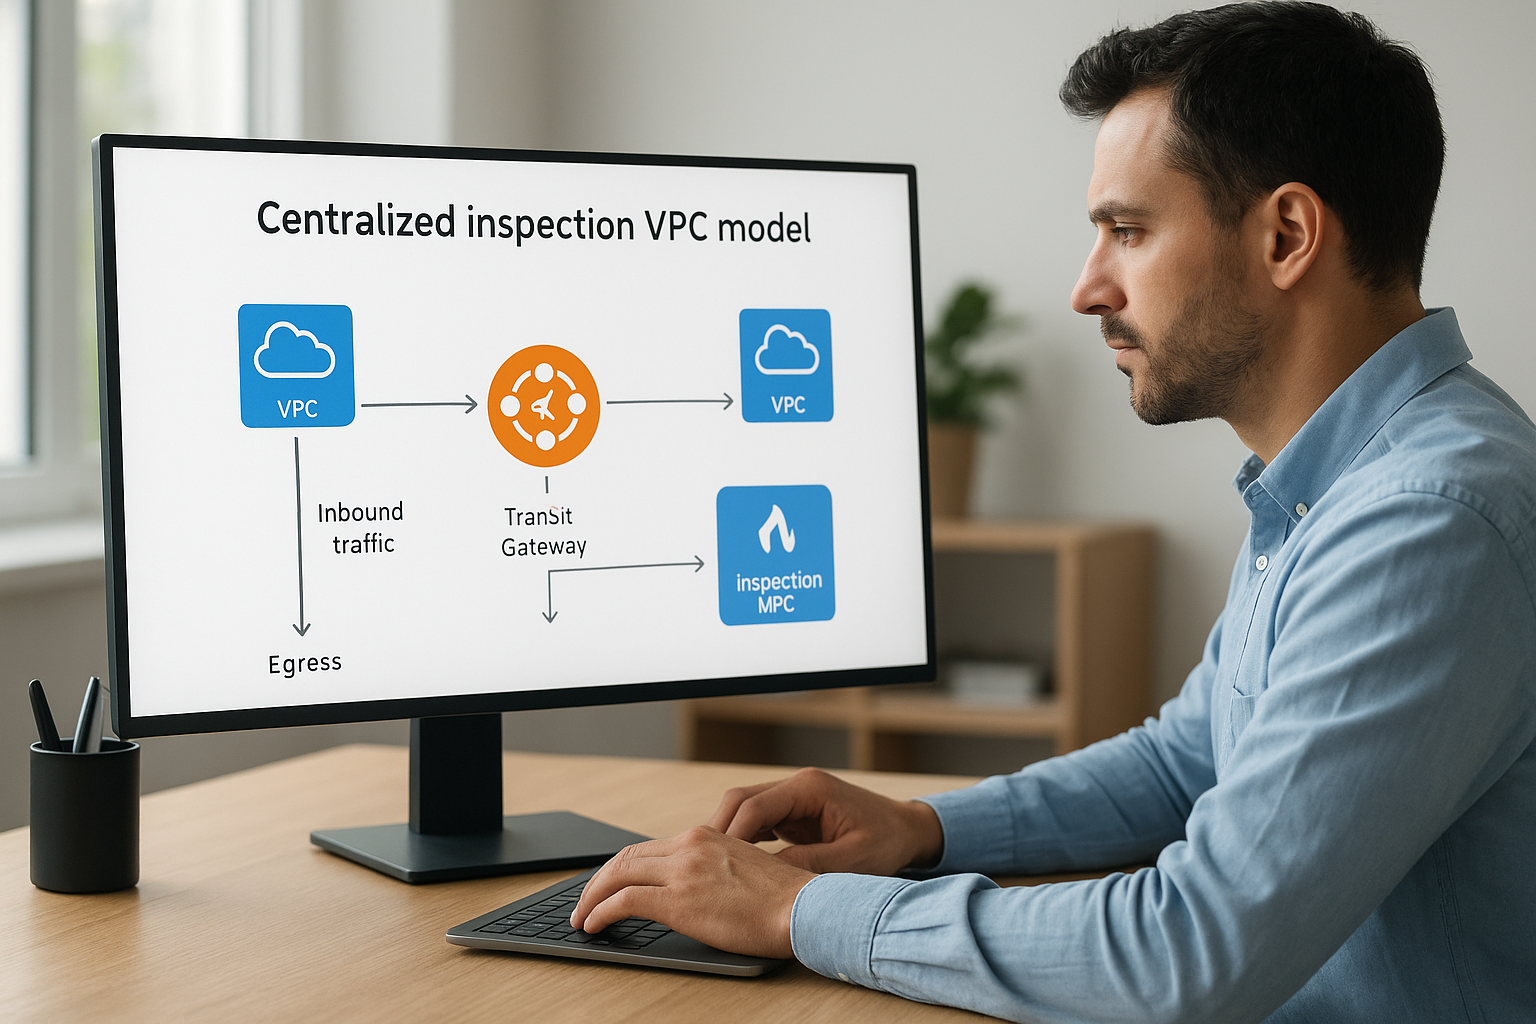
Use the centralized model if you run more than three VPCs or need a single point of policy enforcement across accounts.
This approach requires you to configure Transit Gateway route tables with specific associations and propagations so traffic follows the correct inspection path. The inspection VPC contains only firewall subnets and a Transit Gateway attachment, no application resources.
Routing path reference
The table below shows how route entries differ between the two models so you can match the pattern to your current environment before creating any resources.
| Traffic path | Distributed route entry | Centralized route entry |
|---|---|---|
| Inbound from internet | IGW to firewall subnet, firewall to app subnet | IGW to TGW, TGW to inspection VPC firewall |
| Egress to internet | App subnet to firewall subnet, firewall to IGW | Spoke VPC to TGW, TGW to inspection VPC, firewall to IGW |
| East-west VPC to VPC | Not inspected by default | Routed through inspection VPC firewall |
Confirm your model before you create a single resource. Changing the routing architecture after deploying endpoints requires deleting and recreating both the firewall and its associated route table entries.
Step 2. Create stateless and stateful rule groups
Rule groups are the building blocks of your entire firewall policy. AWS Network Firewall separates traffic inspection into two distinct layers: stateless rule groups that evaluate each packet in isolation without connection context, and stateful rule groups that track connection state and apply protocol-aware or domain-based filtering. You configure each type independently and then attach them to a policy, so getting the rule group structure right before you touch the policy saves you significant rework later.
Write stateless rules first
Stateless rules run before stateful inspection and process every packet without any awareness of connection history. You assign each rule a numeric priority, where lower numbers execute first, and then define match conditions based on source IP, destination IP, protocol, and port range. When a packet matches, the rule applies one of three terminal actions: pass, drop, or forward to stateful inspection.
Set your stateless default action to forward unmatched traffic to stateful inspection rather than dropping it, or you will block legitimate connections before your stateful rules ever evaluate them.
Use this reference when filling out a new stateless rule group in the console or via API:
| Field | Example value |
|---|---|
| Rule group name | stateless-forward-web-traffic |
| Capacity | 100 |
| Rule priority | 10 |
| Source IP | 0.0.0.0/0 |
| Destination port | 443 |
| Protocol | TCP |
| Action | Forward to stateful |
Write stateful rules using Suricata syntax
Stateful rule groups give you connection-aware inspection and support three authoring formats: standard five-tuple rules, domain list rules, and Suricata-compatible IPS rules. The Suricata format gives you the most control, and the aws network firewall documentation confirms it follows open-source Suricata rule syntax, which means existing Suricata rulesets you already maintain will transfer directly without conversion.
Here is a concrete Suricata rule that drops outbound TLS traffic to a specific malicious domain:
drop tls $HOME_NET any -> $EXTERNAL_NET any (tls.sni; content:"malicious-example.com"; nocase; sid:1000001; rev:1;)
Set rule group capacity carefully when you create either type, because you cannot increase capacity after creation without deleting and rebuilding the group entirely. Capacity measures the processing cost of your rules rather than a simple rule count, and stateful rules vary in cost based on complexity. A practical starting point is setting capacity to twice your current rule volume so you have room to expand without disrupting live traffic.
Step 3. Build a firewall policy with strict ordering
A firewall policy is the container that ties your rule groups together and defines exactly how AWS Network Firewall processes traffic. You create one policy per firewall, attach your stateless and stateful rule groups to it, and then set default actions that determine what happens to packets no rule explicitly handles. The policy also controls evaluation order, which is why strict ordering deserves attention before you attach a single rule group. Getting the order wrong causes lower-priority rules to override the ones you intended to run first.
Attach rule groups in the right order
The aws network firewall documentation separates policy evaluation into two stages: stateless processing first, stateful processing second. Within each stage, you assign a numeric priority to every rule group you attach, and lower numbers run before higher numbers. This means your most specific or most critical rules should carry the lowest priority numbers so AWS evaluates them before broader catch-all rules.
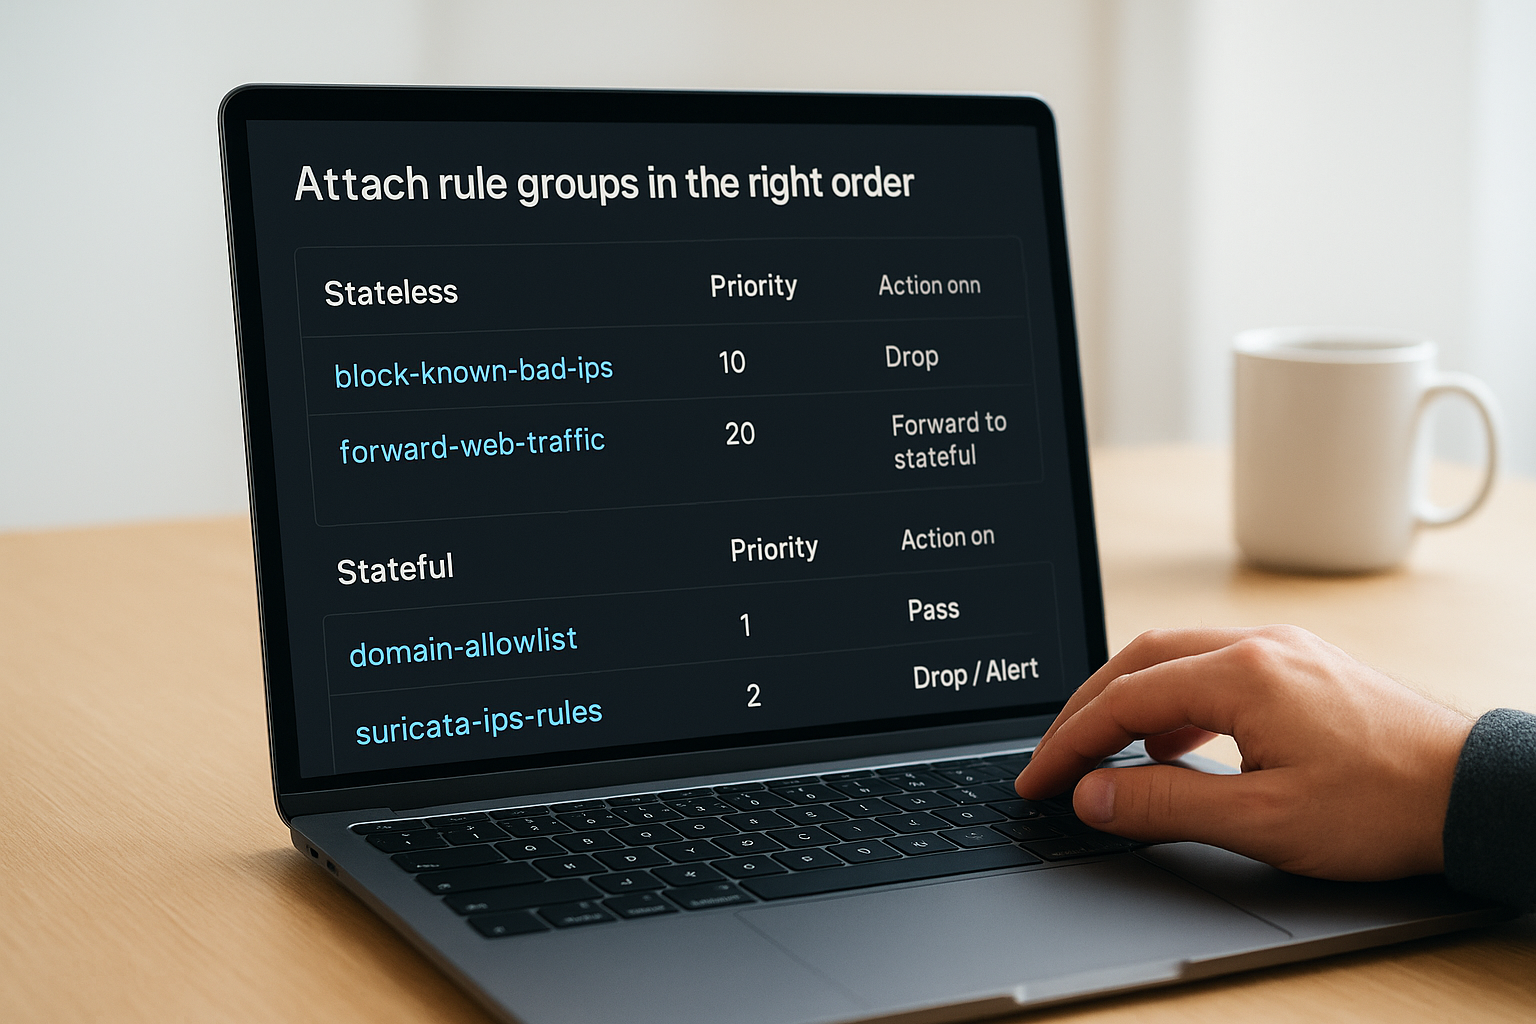
Attach no more than 20 stateless rule groups and 20 stateful rule groups per policy, and reserve capacity headroom in each group before go-live so you can add rules without rebuilding the policy.
Use the following structure when you build your policy in the console or with the AWS CLI:
| Stage | Rule group name | Priority | Action on match |
|---|---|---|---|
| Stateless | block-known-bad-ips |
10 | Drop |
| Stateless | forward-web-traffic |
20 | Forward to stateful |
| Stateful | domain-allowlist |
1 | Pass |
| Stateful | suricata-ips-rules |
2 | Drop / Alert |
Set default actions for unmatched traffic
After all rule groups run, traffic that did not match any rule reaches the policy default actions. You configure separate defaults for stateless unmatched packets and for stateful unmatched flows. For the stateless stage, set the default to forward to stateful inspection rather than pass or drop, so your stateful rules get a chance to evaluate all connections that stateless rules did not explicitly handle.
For the stateful default action, set it to drop established so that any connection not explicitly permitted by your stateful rules gets blocked at session close rather than passing silently. Pair this with an alert action on the same unmatched traffic so your logs capture what the firewall is dropping without requiring you to write individual alert rules for every possible pattern. Confirm both default actions are saved before you attach the policy to a live firewall.
Step 4. Deploy the firewall endpoints in your VPC
With your rule groups and policy in place, you can now create the actual firewall resource that AWS deploys into your VPC. This step is where the logical configuration you built in steps two and three becomes active infrastructure. AWS provisions an endpoint in each Availability Zone you specify, and those endpoints receive unique VPC endpoint IDs that you will reference when updating your route tables in the next step.
Create the firewall resource in the console or via CLI
Open the AWS Network Firewall console, select Create firewall, and fill in the firewall name, your target VPC, and the dedicated subnet IDs for each Availability Zone. Attach the policy you built in step three on the same screen. If you prefer the CLI, use the command below as your starting template and replace the placeholder values with your actual resource IDs:
aws network-firewall create-firewall \
  --firewall-name my-vpc-firewall \
  --firewall-policy-arn arn:aws:network-firewall:us-east-1:123456789012:firewall-policy/my-firewall-policy \
  --vpc-id vpc-0abc123456789def0 \
  --subnet-mappings SubnetId=subnet-0aa111bbb2222cccc \
                    SubnetId=subnet-0dd333eee4444ffff \
  --region us-east-1
Run
aws network-firewall describe-firewallimmediately after creation and confirm theStatusfield readsREADYbefore you modify any route tables, because routing traffic to an endpoint that is still provisioning drops all packets silently.
The aws network firewall documentation notes that provisioning typically completes in a few minutes per AZ, but can take longer in regions with high capacity demand. Poll the status rather than setting a fixed wait timer in any automation scripts you write.
Capture the endpoint IDs before moving on
Once the firewall status shows READY, run describe-firewall again and record the VpcEndpointId value listed under each SubnetMapping in the response. These IDs look like vpce-0a1b2c3d4e5f67890 and are not visible in the standard VPC console view. You will paste these endpoint IDs directly into your route table entries in the next step, so store them in a note or variable before you close the terminal session.
Confirm that each Availability Zone you plan to route traffic through has a corresponding endpoint ID in the output. If an AZ is missing, the subnet mapping did not attach correctly, and you need to update the firewall configuration to add it before proceeding.
Step 5. Update route tables for symmetric routing
Routing is where most AWS Network Firewall deployments break in practice. Symmetric routing means that inbound and outbound traffic for the same connection must pass through the same firewall endpoint in the same Availability Zone. If inbound traffic enters through the firewall endpoint in us-east-1a but your route table sends the return traffic out through a different path, the firewall drops the connection because it cannot match the response to an existing session. You need to update three sets of route tables to enforce the correct path: the Internet Gateway edge routes, the firewall subnet routes, and the application subnet routes.
Understand why each route table plays a different role
Your Internet Gateway ingress route table intercepts traffic before it reaches any subnet. You attach this route table directly to the IGW, not to a subnet, which is an unusual AWS construct that many teams overlook. This edge route table points all inbound traffic destined for your application subnet CIDRs toward the firewall endpoint ID you captured in the previous step. Without this entry, inbound packets skip the firewall entirely and land directly in your application subnets uninspected.
If you forget the IGW edge route table, your stateful rules will never see inbound connections, and your firewall will report zero matches even when traffic is flowing.
Your firewall subnet route table needs a default route pointing to the IGW so that inspected traffic can continue outbound after the firewall processes it. Your application subnet route table needs its default route pointing to the firewall endpoint rather than directly to the IGW, which forces all egress traffic through inspection before it leaves the VPC.
Build the route entries with the correct targets
Use the endpoint IDs you recorded in step four to fill in the target column for each entry. The table below shows the exact route configuration for a single Availability Zone in a distributed deployment.
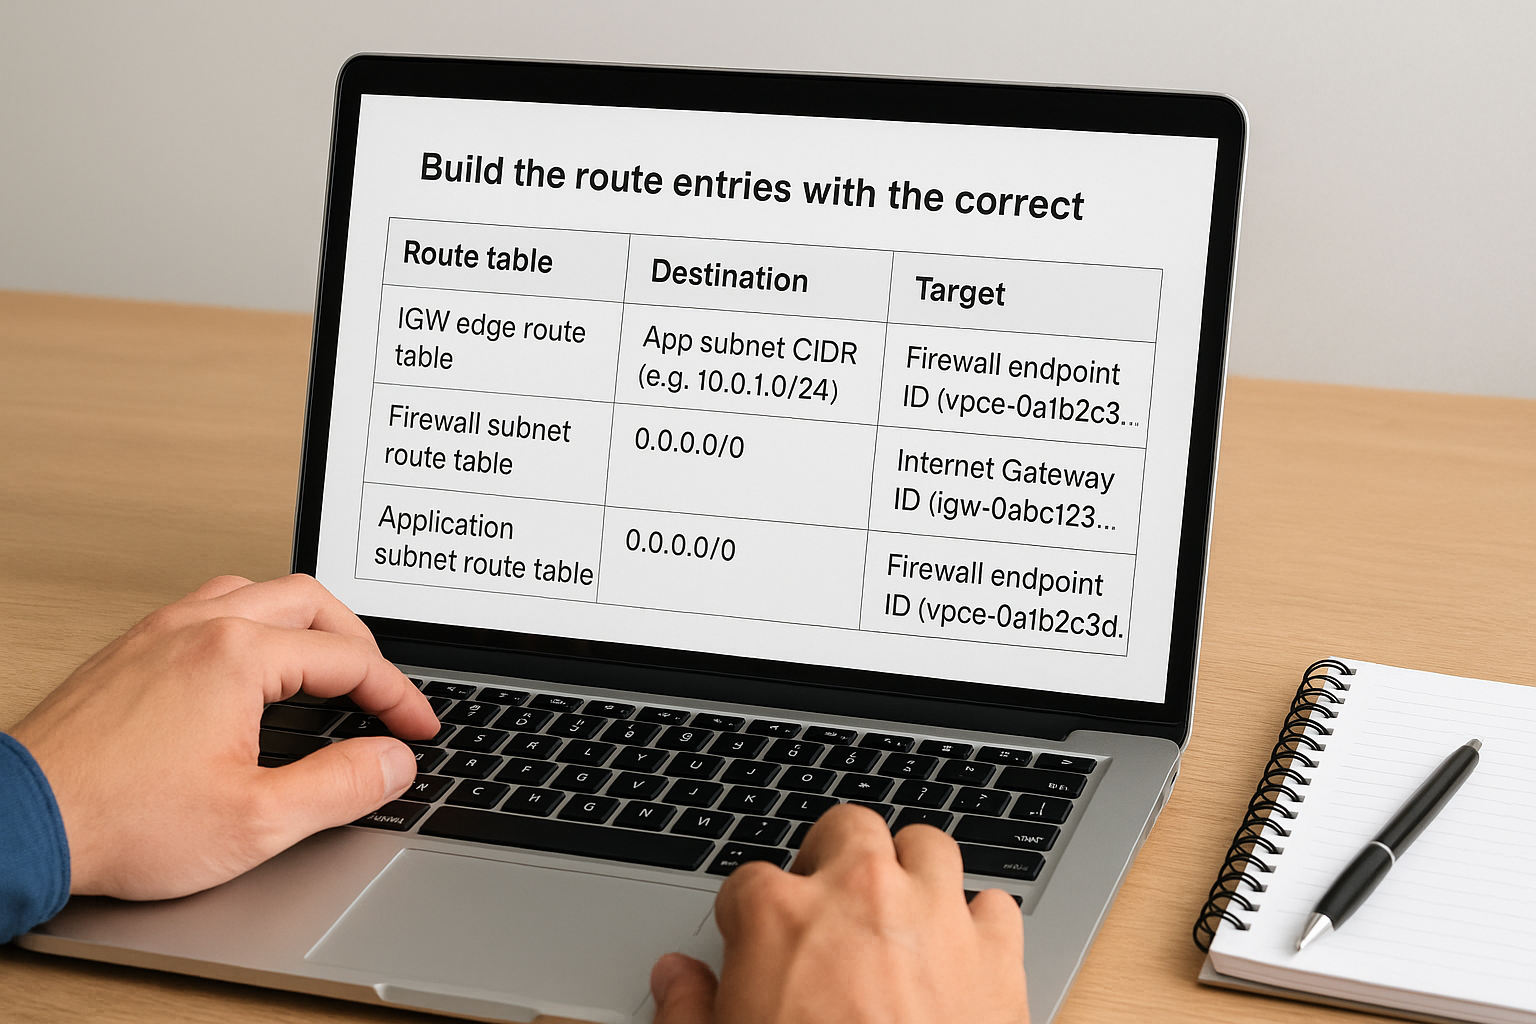
| Route table | Destination | Target |
|---|---|---|
| IGW edge route table | App subnet CIDR (e.g., 10.0.1.0/24) |
Firewall endpoint ID (vpce-0a1b2c3d...) |
| Firewall subnet route table | 0.0.0.0/0 |
Internet Gateway ID (igw-0abc123...) |
| Application subnet route table | 0.0.0.0/0 |
Firewall endpoint ID (vpce-0a1b2c3d...) |
Repeat this pattern for every Availability Zone where you deployed a firewall endpoint. The aws network firewall documentation on Amazon’s site specifies that each AZ must route independently through its local endpoint to preserve session state. Mixing endpoints across AZs in your route entries breaks stateful inspection the same way an asymmetric path does. After saving all route tables, verify the changes by sending a test packet through each AZ and confirming the firewall logs show a match.
Step 6. Turn on logging, metrics, and alerts
Logging is not optional once your firewall endpoints carry live traffic. The aws network firewall documentation outlines two distinct log types you need to configure: flow logs that record every connection the firewall processes, and alert logs that capture every packet matching a rule set to alert or drop action. Without both active, you are running a firewall blind. Neither log type turns on by default, so you must configure each destination explicitly after the firewall reaches READY status.
Configure flow logs and alert logs
AWS Network Firewall sends logs to three destinations: Amazon S3, Amazon CloudWatch Logs, and Amazon Kinesis Data Firehose. You can use a different destination for each log type if your team separates operational and security data. The CLI command below enables both log types to CloudWatch in a single call. Replace the log group names and ARN with your actual values before running it.
aws network-firewall update-logging-configuration \
  --firewall-name my-vpc-firewall \
  --logging-configuration '{
    "LogDestinationConfigs": [
      {
        "LogType": "FLOW",
        "LogDestinationType": "CloudWatchLogs",
        "LogDestination": {"logGroup": "/aws/network-firewall/flow"}
      },
      {
        "LogType": "ALERT",
        "LogDestinationType": "CloudWatchLogs",
        "LogDestination": {"logGroup": "/aws/network-firewall/alert"}
      }
    ]
  }' \
  --region us-east-1
Create both CloudWatch log groups before running this command, because AWS does not create them automatically and the API call will fail silently if the target group is missing.
Set up CloudWatch metrics and alarms
AWS Network Firewall publishes built-in CloudWatch metrics under the AWS/NetworkFirewall namespace without any extra configuration on your part. The metrics you should alarm on immediately are listed in the table below.
| Metric | What it signals | Recommended threshold |
|---|---|---|
DroppedPackets |
Rules are blocking traffic | Alert when count rises more than 20% above baseline |
PassedPackets |
Baseline traffic volume | Alert on sudden drops, which may indicate routing failure |
InvalidDroppedPackets |
Malformed packets hitting the firewall | Alert any non-zero value in production |
Build a CloudWatch alarm on DroppedPackets first, since a sudden spike often indicates either an active threat or a misconfigured rule that started blocking legitimate traffic. Set the evaluation period to 5 minutes with at least two consecutive breaches required before the alarm fires, which filters out brief spikes from normal traffic bursts.
Step 7. Validate, troubleshoot, and tune rules
With logging active and route tables updated, you need to confirm the firewall is actually inspecting traffic before you call the deployment complete. Validation is not a one-time check. You run tests, read the output, fix what breaks, and adjust rules until the firewall passes the traffic it should and drops the traffic it should not. The aws network firewall documentation covers expected log formats, so open your CloudWatch log group and compare what you see against those patterns as your baseline.
Send test traffic and read the logs
Your first validation step is sending known traffic through each Availability Zone and confirming the corresponding log entries appear. Use curl from an EC2 instance inside your protected subnet to reach an external domain you have explicitly allowed, and then try a domain your rules block. Both requests should produce log entries within one to two minutes.
Run this from your EC2 instance to generate test traffic and verify the firewall responds correctly:
# Test an allowed domain (should succeed)
curl -I https://www.amazon.com

# Test a blocked domain (should fail with connection timeout)
curl -I https://malicious-example.com --max-time 10
Then query your CloudWatch alert log group with this pattern to confirm a drop event appeared:
aws logs filter-log-events \
  --log-group-name /aws/network-firewall/alert \
  --filter-pattern "DROP" \
  --start-time $(date -d '10 minutes ago' +%s000) \
  --region us-east-1
If no log entries appear after sending test traffic, your route tables are most likely pointing to the wrong endpoint ID or the IGW edge route table was not saved correctly.
Fix the most common rule problems
Asymmetric routing and missing default actions cause most issues teams hit after first deployment. If your stateful rules are not matching sessions you expect them to catch, verify that both inbound and outbound traffic for the same connection travels through the same AZ endpoint by checking the source and destination fields in your flow logs.
Use this quick checklist to work through the most frequent failures in order:
- Blank alert logs: confirm the log group existed before you ran
update-logging-configuration - Stateful rules not matching: check that your stateless default action forwards to stateful rather than passing directly
- Legitimate traffic blocked: lower the priority of your pass rules so they evaluate before broad drop rules
- Capacity errors on rule groups: rebuild the group with double the original capacity value before reattaching it to the policy
What to do after your first deployment
Your first deployment gives you a working firewall, but the real work is maintaining it. Review your alert logs weekly for the first month to identify rules that fire too broadly or too rarely, then tighten them based on actual traffic patterns. The aws network firewall documentation recommends scheduling periodic policy reviews, and that advice holds: threat patterns shift, and rules you write today may need updating in 90 days.
Beyond tuning, expand your coverage by enabling TLS inspection for encrypted egress traffic, which requires a separate TLS inspection configuration attached to your policy. Also consider connecting your firewall policy to AWS Firewall Manager if you manage more than one VPC or account, so you can push consistent rule updates from a central location instead of editing each firewall individually.
Your cloud security only goes as far as the infrastructure beneath it. For the physical network foundation your Southwest Florida facility depends on, contact the CommX Networks team today.